When you're setting up your home theater, managing a business network, or handling a data center, a mess of cables could quickly become a hassle. A consistent and clear marking system for cables is the most efficient method to avoid frustration, reduce time, and secure your equipment.
In this article, you'll learn the proper way to mark your cables like a professional, the best tools for the job, and expert tips for keeping your wiring clean and future-proof.
Why Labeling Cables Matters

Cables that aren't well-organized don't just appear messy—they can also cause serious problems:
- Troubleshooting Issues: Without labels, locating the correct wire during maintenance can be inefficient and error-prone.
- Safety Risks: Unplugging the wrong cable or cutting the right wire could damage devices or disrupt crucial systems.
- Scaling Problems: As you add or upgrade devices, unidentified cables make expansion much more difficult.
A clear label system is crucial for everyone who values reliability and efficiency—from DIY enthusiasts to IT professionals.
Common Types of Cable Labels
The right kind of label is essential for durability and clarity. Here are the most popular options:
|
Label Type |
Best For |
Advantages |
|
Self-Adhesive Labels |
Small or home office setups |
Quick, affordable, and easy to apply |
|
Heat Shrink Labels |
Outdoor or industrial wiring |
Extremely tough and water-resistant |
|
Tag Labels |
Testing or temporary connections |
Easy to remove and reuse |
|
Wrap-Around Labels |
Data centers, server rooms |
Secure fit for thin network cables |
Tip: Match the label material to the environment. For example, thermoplastic tubing works well in exposed or oily areas, while wrap-around labels are better suited for densely packed network racks.
Tools and Materials You’ll Need

Before starting, gather the following essentials:
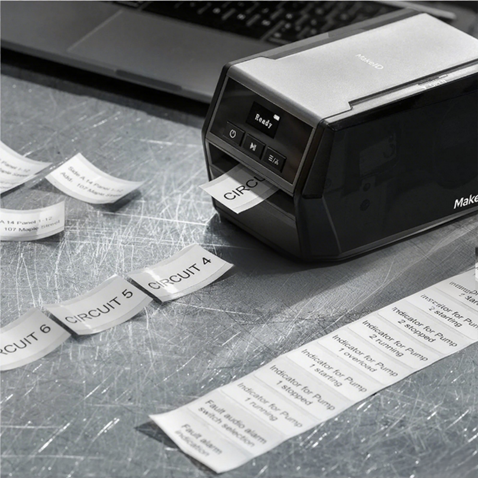
- Cable label maker or printer: Prints clear, smudge-proof text. Choose handheld models for fieldwork or desktop models for large-scale printing.
- High-quality label tape or tubing: Ensure resistance to water, fading, and scratching.
- Fine-tip marker: Useful for quick handwritten notes.
- Cable ties and scissors: To secure and organize bundles after labeling.
A reliable cable label maker is a worthwhile investment if you manage large volumes of wires in professional environments.
Step-by-Step Guide: How to Label Cables
https://www.youtube.com/watch?v=dB_ZzRCYoIw
Follow these steps for a clean and professional cable labeling system:
1. Plan Your Layout
Group cables by purpose (power, audio, data, etc.) and map out where each cable will go. A well-planned layout prevents tangling and confusion.
2. Select the Right Label
Choose a label type suited to the cable size and environment. For thick power cords, heat shrink tubing works well. For Ethernet lines, wrap-around labels are ideal.
3. Clean the Surface
Wipe cables with a dry cloth to remove dirt or oil. This ensures labels adhere properly.
4. Print or Write Clearly
If using a printer, select legible fonts and sufficient text size. If writing by hand, use a fine-tip pen and keep labels concise yet informative.
5. Apply the Label
Place the label near the connector or plug for easy visibility, ensuring it wraps tightly without bubbles.
6. Test for Visibility and Durability
Check readability in normal lighting and gently pull the label to confirm adhesion. Replace labels that peel or smudge.
Pro Tips for Better Cable Labeling
- Color Code: Use different colors for power, network, or audio cables.
- Tag Both Ends: Label both ends of each cable to avoid confusion during maintenance.
- Mid-Point Tags: For cables running through ceilings or walls, add labels at multiple points.
- Digital Record-Keeping: Maintain a spreadsheet or digital map with each cable’s name and destination.
💡 Standardized naming (e.g., “PC-01-LAN” for a computer’s network line) makes large projects much easier to manage.
Maintaining and Updating Cable Labels
Labeling isn’t a one-time task. For long-term clarity:
- Inspect labels every few months for peeling or fading.
- Update labels when upgrading, replacing, or relocating cables.
- Keep spare tapes and labels with your tools for quick replacements.
For server rooms or offices, pairing physical labels with a database or asset-tracking software ensures full synchronization.
Conclusion
Mastering the art of labeling cables is one of the simplest ways to protect your technology investments and maintain an organized workspace. With the right tools, durable labels, and a consistent process, you’ll save hours of troubleshooting and enjoy a reliable wiring system that grows with your needs.
Whether you’re upgrading a home office or managing a data center, careful cable labeling transforms chaos into clarity—keeping your equipment secure and your workflow efficient for years to come.